Docker Desktop
Docker desktop with Kubernetes
This page walks through installing and running Fission on Docker Desktop’s built-in Kubernetes, including known issues and workarounds. Docker desktop allows you to run and manage Docker and Kubernetes on workstations for local development.
You will need to enable Kubernetes by going to the Kubernetes tab in preferences. If this is your first time, downloading the Kubernetes binaries will take a few minutes. Once Kubernetes is fully running, you should see a green icon and the text “Kubernetes is running” as shown in the screenshot below.
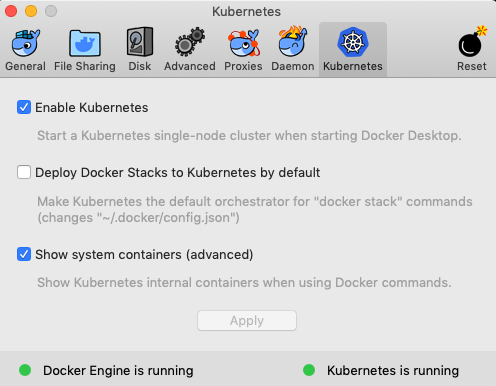
Docker Desktop also configures kubectl on your machine.
For more details, check the documentation specific to Docker for Windows or Docker for Mac.
Installing Fission
See Fission installation to learn more how to install Fission.
Accessing Routes
The router service is exposed as a random NodePort on the host machine. Find the port with the command below:
$ export PORT=$(kubectl get svc router -n fission -o jsonpath='{.spec.ports[0].nodePort}')
Create a route to the function and access it as shown below:
$ fission route create --name helloscale --function helloscale --url helloscale
trigger 'helloscale' created

$ curl http://localhost:$PORT/helloscale
If you are using serviceType LoadBalancer, access the router on its external IP address, using port 80 by default.
Autoscaling
Docker for Desktop does not ship with a metrics server by default.
So if you create a function with the newdeployment executor type, autoscaling will not work as expected, because the HPA cannot read actual pod consumption and the value remains <unknown>.
For example, kubectl get hpa shows the target stuck at <unknown>:
$ kubectl get hpa
NAME                                    REFERENCE                                          TARGETS         MINPODS   MAXPODS   REPLICAS   AGE
newdeploy-helloscale-default-ql0uqiwp   Deployment/newdeploy-helloscale-default-ql0uqiwp   <unknown>/50%   1         6         1          20h
This can be fixed by installing the metrics-server, starting with its latest release:
$ kubectl apply -f https://github.com/kubernetes-sigs/metrics-server/releases/latest/download/components.yaml
On Docker Desktop, the kubelet serving certificate is self-signed, so you must let the metrics server skip TLS verification.
Patch the deployment to add the --kubelet-insecure-tls flag:
$ kubectl -n kube-system patch deployment metrics-server \
    --type=json \
    -p='[{"op":"add","path":"/spec/template/spec/containers/0/args/-","value":"--kubelet-insecure-tls"}]'
After a few minutes, validate that the metrics server is working by running:
$ kubectl top node
NAME                 CPU(cores)   CPU%   MEMORY(bytes)   MEMORY%
docker-for-desktop   662m         16%    1510Mi          79%
The HPA now picks up the pod values, so autoscaling works:
$ kubectl get hpa
NAME                                    REFERENCE                                          TARGETS         MINPODS   MAXPODS   REPLICAS   AGE
newdeploy-helloscale-default-gkxdkl8y   Deployment/newdeploy-helloscale-default-gkxdkl8y   20%/50%   1         6         1          48s
If the HPA still does not show current pod usage after installing the metrics server, check that you set both a limit and a request for CPU when creating the function:
$ fission fn create --name helloscale --env nodescale  --code hello.js --executortype newdeploy \
                    --minmemory 64 --maxmemory 128 --mincpu 100 --maxcpu 500 --minscale 1 --maxscale 6  --targetcpu 50
See the autoscaling section of the documentation for more details.