Advanced Setup
In this guide you will learn how to setup fission in order to serve heavy workloads on production systems.
Define Correct Resource Request/Limits
By default, there is no resource requests/limits setting for fission component pods. But it’s always wise set them up if you’re trying to run any application on Kubernetes for production. We recommend that you run benchmarks to simulate real traffic and setup resource request/limits of components accordingly.
You can get component pods resource usage by using the following command.
kubectl -n fission top pod
And follow the guide to setup components’ deployment.
Setup SSL/TLS for Functions
Since fission router is not responsible to handle the encrypted traffic to functions, you should put fission routers behind any existing proxy solution like NGINX, Caddy or Ambassador that helps to handle SSL/TLS connections.
You can also set up Ingress with TLS termination to expose functions, see here.
Router
Create HPA for Router Service
NOTE: You have to set up resource requests/limits for router before creating HPA.
The router is the entry point of all functions. It accepts, verifies and redirects requests to corresponding function pods.
As workload goes higher, router consumes more resources than idle state and users may experience higher latency.
To prevent this, you have to scale the replicas of router based on your use case. However, in real world cases,
the workload goes up and down in different time slot and it’s not realistic to give a fixed number of replicas
Horizontal Pod Autoscaler a.k.a HPA is the way for Kubernetes to scale the replicas of a deployment based
on the overall resource utilization across pods. Once HPA created, Kubernetes will then scale
in/out the replicas of router automatically.
Visit HPA documentation to know how to setup HPA for router deployment.
Enable Keep-Alive Setting
NOTE: Require Fission 1.4.0+
Keep-Alive allows to use existing connections to send requests without creating a new one and lower the latency for subsequent requests. However, it also limits the ability to distribute traffic to new pods since existing connections remain connected to old pods
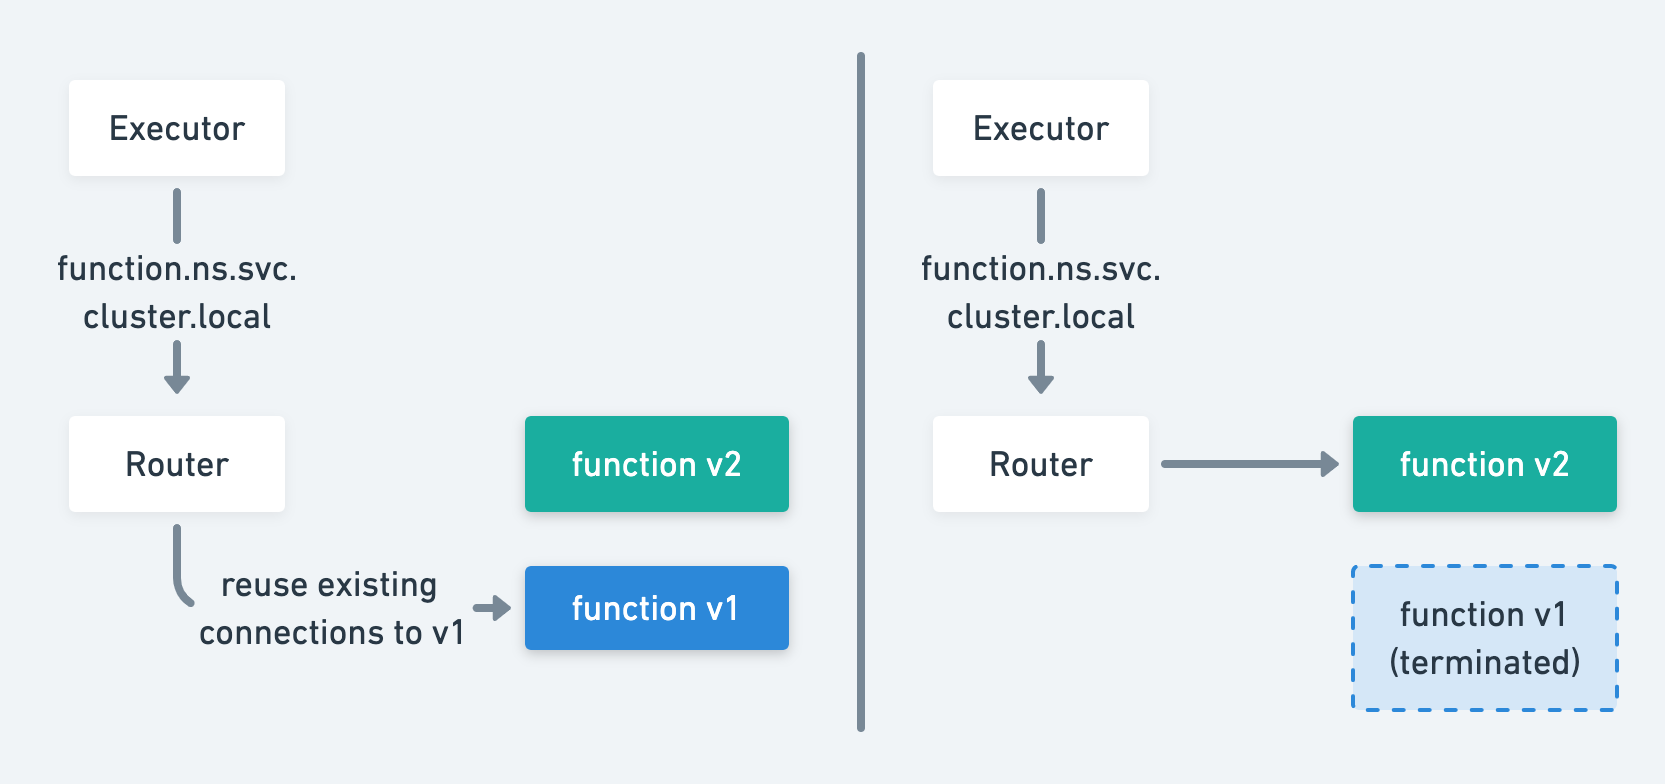
Keep-Alive
As shown in the figure above, the router tries to send requests to v1 function pod even after v2 is up. Only when the v1 function pod is terminated, router will then re-establish connections to v2. (See issue here)
Enable Keep-Alive through the chart value (recommended):
router.roundTrip.disableKeepAlive=false
This renders the ROUTER_ROUND_TRIP_DISABLE_KEEP_ALIVE environment variable on the router deployment:
env:
- name: ROUTER_ROUND_TRIP_DISABLE_KEEP_ALIVE
  value: "false"
Couple things worth noticing:
- This setting increases time for router(s) to switch to newer version for functions that use newdeploy as executor type.
You can prevent this by setting short grace period (
--graceperiod) when creating environment. - There is an increase in memory consumption of router to keep all active connections.
Annotations Support for Router Service
Router now supports addition of annotations so the LoadBalancer created in your cloud provider can be customized to your needs. The specifics of annotations vary from cloud to cloud and you should check the related documentation.
For ex. On GKE, a LoadBalancer type service by default is accessible from the outside of Kubernetes cluster.
But if you instead want to expose service to the applications that use the same VPC network and are located in the same GCP region,
you can do by adding an extra annotation to the Service.
To enable internal LoadBalancer, you need to uncomment the svcAnnotations in chart’s values.yaml.
router:
  svcAnnotations:
    cloud.google.com/load-balancer-type: Internal
Deploy Router as Daemonset
ReplicaSet generated by Deployment distributes pods to nodes based on nodes resource usage, which means in some cases the newly created pods are assigned to only a few nodes. The requests will go to the same node if there are multiple router pods on it and may increase the burden of node resource and overall request latency.
To solve the problem mentioned above, now you can deploy the router as DaemonSet by setting router.deployAsDaemonSet to true
when using helm to install Fission, in order to distribute requests across all nodes for better workload distribution and lower latency.
Encoded URL Support
Fission uses gorilla/mux to match URL for functions and it by default matches path /foo%2Fbar/hello to /foo/bar/hello instead of
URL path /{name}/hello. To enable encoded path support in router, you need to set router.useEncodedPath to true when using helm to install Fission.
Display Access Logs
To show HTTP trigger access log, you have to set
router.displayAccessLog=true
when using helm to deploy 1.7.0. Or, you can change the environment variable
DISPLAY_ACCESS_LOG of router deployment to "true".
Once enabling endpoint access log, the router resource utilization increases when under heavy workloads.
Trace sampling rate
Fission emits OpenTelemetry traces. The sampler decides, per request, whether a span is recorded, based on a configurable probability.
To change the sampling probability, set the chart value:
openTelemetry.tracesSamplingRate=0.01
This renders the OTEL_TRACES_SAMPLER_ARG environment variable on the Fission components.
A value of 1 samples every incoming request and 0 disables sampling entirely.
The chart default is 0.1.
Executor
Orphaned Resource Adoption (Experiment, 1.7.0+)
The executor used to be a stateful application that stores all kubernetes resources information it created in memory. Store in memory means we are not able to retrieve information back if executor pod gets deleted/restarted. So when a new executor starts, it detects and removes the kubernetes objects created by the deleted executors in order to rebuild the resources map. However, this approach may affect alive requests to function pods and terminates/deletes all existing pods when executor starts.
After 1.7.0, we use annotations to store all necessary information for resource adoption. Also, an experiment feature allows the executor to adopt existing orphaned kubernetes objects has been added to the codebase. Once the adoption feature enabled, whenever a new executor starts it will first try to adopt all resources created by the old executor instead of removing them like before.
There are no silver bullets, this adoption feature increases the overall startup time of executor if there are huge amounts of resources exist in the cluster. Also, requests to function that have no function pods exists yet will fail due to the executor is still in boot up process. The executor will wait at most 30 seconds for resources adoption, after that executor will start API service.
You can enable this feature by specify executor.adoptExistingResources to true when installing/upgrading Fission 1.7.0 with helm.
--set executor.adoptExistingResources=true
Or, you can enable it by modifying environment variable of deployment of executor.
- name: ADOPT_EXISTING_RESOURCES
  value: "true"
The executor will still delete resources when you upgrade from a version prior 1.7.0 even the feature is enabled.