RabbitMQ
A RabbitMQ message queue trigger invokes a Fission function whenever a message arrives in a RabbitMQ queue. Your RabbitMQ instance can be on prem or hosted on any of the cloud service providers like AWS, Azure or GCP.
We’ll assume you have Fission and Kubernetes installed. If not, head over to the Fission install guide.
To enable KEDA integration, set the flag
mqt_keda.enabledtotruewhile installing Fission with helm chart.
Also install the Keda Helm Chart in your cluster for Fission Keda Kafka trigger to work.
You will also need RabbitMQ setup which is reachable from the Fission Kubernetes cluster.
Installation
If you want to setup RabbitMQ on a Kubernetes cluster, you can use the HELM chart.
Once RabbitMQ is installed, run helm status my-release (replace my-release with your release name) to get the username, password, host, and other connection details, shown below.
NAME: my-release
LAST DEPLOYED: Wed Jan 12 09:50:02 2022
NAMESPACE: default
STATUS: deployed
REVISION: 1
TEST SUITE: None
NOTES:
CHART NAME: rabbitmq
CHART VERSION: 8.26.0
APP VERSION: 3.9.12** Please be patient while the chart is being deployed **

Credentials:
    echo "Username      : user"
    echo "Password      : $(kubectl get secret --namespace default my-release-rabbitmq -o jsonpath="{.data.rabbitmq-password}" | base64 --decode)"
    echo "ErLang Cookie : $(kubectl get secret --namespace default my-release-rabbitmq -o jsonpath="{.data.rabbitmq-erlang-cookie}" | base64 --decode)"

Note that the credentials are saved in persistent volume claims and will not be changed upon upgrade or reinstallation unless the persistent volume claim has been deleted. If this is not the first installation of this chart, the credentials may not be valid.
This is applicable when no passwords are set and therefore the random password is autogenerated. In case of using a fixed password, you should specify it when upgrading.
More information about the credentials may be found at https://docs.bitnami.com/general/how-to/troubleshoot-helm-chart-issues/#credential-errors-while-upgrading-chart-releases.

RabbitMQ can be accessed within the cluster on port  at my-release-rabbitmq.default.svc.

To access for outside the cluster, perform the following steps:

To Access the RabbitMQ AMQP port:

    echo "URL : amqp://127.0.0.1:5672/"
    kubectl port-forward --namespace default svc/my-release-rabbitmq 5672:5672

To Access the RabbitMQ Management interface:

    echo "URL : http://127.0.0.1:15672/"
    kubectl port-forward --namespace default svc/my-release-rabbitmq 15672:15672
Generate the password and note it down.
Use the credentials and login to the web portal which can be accessed at: http://127.0.0.1:15672/
Overview
The flow below shows the events and functions involved.
- A Go producer function (producer) that drops a message in a RabbitMQ queue named
request-topic. - Fission RabbitMQ trigger activates upon message arrival in
request-topicand invokes another function (consumer) with message received from producer. - The consumer function (consumer) gets body of message and returns a response.
- Fission RabbitMQ trigger takes the response of consumer function (consumer) and drops the message in a response queue named
response-topic. If there is an error, the message is dropped in error queue namederror-topic.
Sample App
You can get the source code for the sample app explained in this document in our Keda RabbitMQ Trigger Repo
Building the app
RabbitMQ Topics
We need to create 3 topics for our example. Follow the steps below to create the required topics:
- On the web portal, navigate to
Queues - Under the
Add a new queueoption enter the name asrequest-topic - Click on
Add Queuebutton
Repeat the above steps for response-topic and error-topic respectively.
For
request-topicwe can also create it from the code.
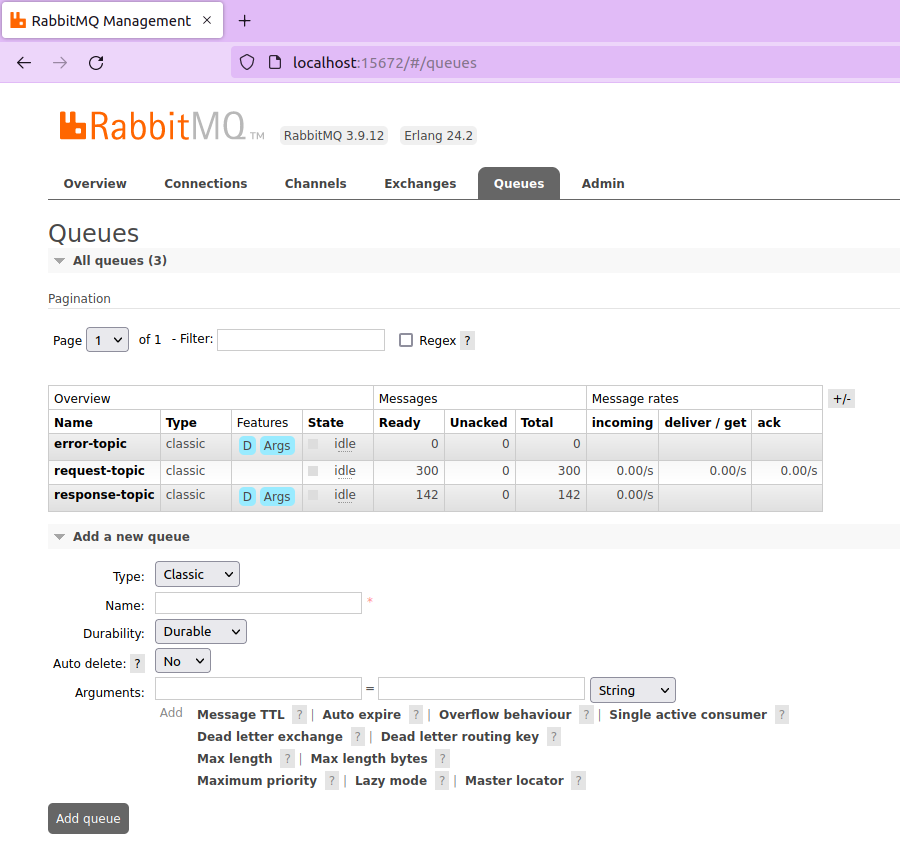 Creating Topics in RabbitMQ Web UI
Secret
We will create a secret.yaml file that will contain the host url for our producer and consumer functions to connect to the queue.
The trigger will also use this to keep an eye on the RabbitMQ queue.
kind: Secret
metadata:
  name: keda-rabbitmq-secret
  namespace: default
stringData:
  host: "amqp://user:password@my-release-rabbitmq.default.svc:5672/"
  queueName: request-topic
Replace the username and password as per your environment.
kubectl apply -f secret.yaml
Producer Function
The producer function is a go program which creates a message with timestamp and drops into a queue request-topic.
The credentials for accessing the RabbitMQ queue have been created using a secret as shown in the earlier section and is referred in the following code.
package main

import (
    "fmt"
    "net/http"
    "os"
    "time"

    amqp "github.com/rabbitmq/amqp091-go"
)

const (
    kedaSecret   = "keda-rabbitmq-secret"
    kedaSecretNs = "default"
    hostKey      = "host"
    queueNameKey = "queueName"
)

func getConfigMapValue(name string, namespace string, key string) ([]byte, error) {
    return os.ReadFile(fmt.Sprintf("/configs/%s/%s/%s", namespace, name, key))
}

func getSecretValue(name string, namespace string, key string) ([]byte, error) {
    return os.ReadFile(fmt.Sprintf("/secrets/%s/%s/%s", namespace, name, key))
}

func Handler(w http.ResponseWriter, r *http.Request) {
    host, err := getSecretValue(kedaSecret, kedaSecretNs, hostKey)
    if err != nil {
        w.Write([]byte(fmt.Sprintf("%s", err)))
        return
    }

    conn, err := amqp.Dial(string(host))
    if err != nil {
        w.Write([]byte(fmt.Sprintf("Failed to connect rabbitmq %s", err)))
        return
    }
    defer conn.Close()

    ch, err := conn.Channel()
    if err != nil {
        w.Write([]byte(fmt.Sprintf("Failed to open a channel %s", err)))
        return
    }
    defer ch.Close()
    queueName, err := getSecretValue(kedaSecret, kedaSecretNs, queueNameKey)
    if err != nil {
        w.Write([]byte(fmt.Sprintf("Error getting queueName %s", err)))
        return
    }

    q, err := ch.QueueDeclare(
        string(queueName), // name
        false,             // durable
        false,             // delete when unused
        false,             // exclusive
        false,             // no-wait
        nil,               // arguments
    )
    if err != nil {
        w.Write([]byte(fmt.Sprintf("Failed to declare a queue %s", err)))
        return
    }

    count := 50
    for msg := 1; msg <= count; msg++ {
        ts := time.Now().Format(time.RFC3339)
        message := fmt.Sprintf("{\"message_number\": %d, \"time_stamp\": \"%s\"}", msg, ts)
        err = ch.Publish(
            "",     // exchange
            q.Name, // routing key
            false,  // mandatory
            false,  // immediate
            amqp.Publishing{
                ContentType: "text/plain",
                Body:        []byte(message),
            })
        if err != nil {
            w.Write([]byte(fmt.Sprintf("Failed to publish message to topic %s: %v", queueName, err)))
            return
        }
    }
    w.Write([]byte(fmt.Sprintf("Published %d messages to topic %s", count, queueName)))
}
Create a zip archive of producer folder using zip -j producer.zip producer/*
Let’s create the environment, package and function:
fission env create --name go --image ghcr.io/fission/go-env-1.26 --builder ghcr.io/fission/go-builder-1.26
fission package create --src producer.zip --env go --name rabbitmq-producer
fission fn create --spec --name rabbitmq-producer --env go --pkg rabbitmq-producer \
    --entrypoint Handler --secret keda-rabbitmq-secret
Consumer Function
The consumer function is a go program which takes the body of the request, processes the message, and returns a response that the trigger drops into response-topic
package main

import (
    "io"
    "log"
    "net/http"
    "strings"
)

func Handler(w http.ResponseWriter, r *http.Request) {
    b, _ := io.ReadAll(r.Body)
    defer r.Body.Close()

    log.Println("Received message", string(b))
    s := string(b)

    w.Write([]byte(strings.ToUpper(s)))
}
Create a zip archive of consumer folder using zip -j consumer.zip consumer/*
Let’s create the package and function:
fission package create --src consumer.zip --env go --name rabbitmq-consumer
fission fn create --name rabbitmq-consumer --env go --pkg rabbitmq-consumer --entrypoint Handler
Connecting via trigger
We have both the functions ready but the connection between them is missing.
Let’s create a message queue trigger which will invoke the consumer function every time there is a message in request-topic queue.
The response will be sent to response-topic queue and in case of consumer function invocation fails, the error is written to error-topic queue.
fission mqt create --name rabbitmq-test --function rabbitmq-consumer --mqtype rabbitmq --mqtkind keda \
    --topic request-topic --resptopic response-topic --errortopic error-topic --maxretries 3 \
    --metadata queueName=request-topic --metadata topic=request-topic  --cooldownperiod=30 \
    --pollinginterval=5 --secret keda-rabbitmq-secret
The --metadata flags above accept these parameters:
| Parameter | Description |
|---|---|
queueName | Name of the RabbitMQ queue on which the trigger is created. |
topic | Name of the topic on which offset lag is processed. |
Specs
You can also use the following Fission spec. Read our guide on how to use Fission spec.
fission spec init
fission env create --spec --name go --image ghcr.io/fission/go-env-1.26 --builder ghcr.io/fission/go-builder-1.26
fission package create --spec --src producer.zip --env go --name rabbitmq-producer
fission package create --spec --src consumer.zip --env go --name rabbitmq-consumer
fission fn create --spec --name rabbitmq-producer --env go --pkg rabbitmq-producer \
    --entrypoint Handler --secret keda-rabbitmq-secret
fission fn create --spec --name rabbitmq-consumer --env go --pkg rabbitmq-consumer --entrypoint Handler
fission mqt create --spec --name rabbitmq-test --function rabbitmq-consumer --mqtype rabbitmq --mqtkind keda \
    --topic request-topic --resptopic response-topic --errortopic error-topic --maxretries 3 \
    --metadata queueName=request-topic --metadata topic=request-topic  --cooldownperiod=30 \
    --pollinginterval=5 --secret keda-rabbitmq-secret
fission spec apply
Testing it out
Let’s invoke the producer function so that the queue request-topic gets some messages and we can see the consumer function in action.
$ fission fn test --name producer
Published 10 messages to topic request-topic
To add authentication to your function calls, refer to our Fission Authentication guide.
To verify if the messages were successfully sent, navigate to the RabbitMQ portal and observe the count of Ready Messages under request-topic
If you’ve followed the tutorial correctly, the message queue trigger will be triggered and our consumer function will be invoked.
To verify if our message queue trigger triggered, you can do so in two ways:
- Navigate to the RabbitMQ portal and observe the count of
Ready Messagesunderresponse-topic
- Open
fission-functionlogs and you should see something like the following output:
poolmgr-go-default-3304406-8695f6fdd8-7kb8b go 2022/01/21 06:55:27 Received message {"message_number": 8, "time_stamp": "2022-01-21T06:53:59Z"}
poolmgr-go-default-3304406-8695f6fdd8-k74pn go 2022/01/21 06:55:27 Received message {"message_number": 41, "time_stamp": "2022-01-21T06:53:39Z"}
poolmgr-go-default-3304406-8695f6fdd8-k74pn go 2022/01/21 06:55:27 Received message {"message_number": 47, "time_stamp": "2022-01-21T06:53:39Z"}
poolmgr-go-default-3304406-8695f6fdd8-4nqgp go 2022/01/21 06:55:27 Received message {"message_number": 4, "time_stamp": "2022-01-21T06:53:59Z"}
poolmgr-go-default-3304406-8695f6fdd8-5jcx4 go 2022/01/21 06:55:27 Received message {"message_number": 10, "time_stamp": "2022-01-21T05:09:30Z"}
Debugging
For debugging, you can check the logs of the pods created in the fission and default namespace.
Typically, function pods are created in the same namespace as their environment, default in this example.
You can check consumer and producer function logs.
Try out the Sample app to see it in action.