Building a Serverless URL Shortener with MongoDB Atlas and Fission
Categories:
A few weeks ago, I delivered a talk on Demystifying Serverless at the MongDB meetup here in Hyderabad. As part of the talk, I also showed a hands-on demo of using Fission with MongoDB Atlas. In this blog post, I’ll talk about building a serverless URL shortener using MongoDB Atlas and Fission serverless framework.
URL Shortener with MongoDB Atlas and Fission
We will create a URL Shortener application using Fission functions. It will have two functions, one for the frontend and the other for the backend to shorten the URL & communicate with MongoDB Atlas.
When a new shortened URL is requested, the function will first check if there exists a shortened URL in the MongoDB collection for the provided URL. If a short URL exists, it will fetch it from the collection else it will create a new URL and store it. This application is written in Python & Flask.
So let’s get started!
Pre Requisites
MongoDB Atlas
MongoDB is a popular NoSQL database which stores data in document-based format. Data is stored in collections which is similar to tables in a relational database. Each collection has multiple documents which is a single unit of data, and it stored like JSON.
MongoDB Atlas is a managed cloud-based offering that eliminats the need to manage the infrastructure. In order to get this working, you’ll need a MongoDB Atlas account. You can register for a Free MongoDB Atlas account and create a collection. Post registration, you need to create a new database. MongoDB Atlas provides you with three options: Serverless, Dedicated and Shared.
For this example, we’ll be using a shared instance as it free to use but comes with limitations.
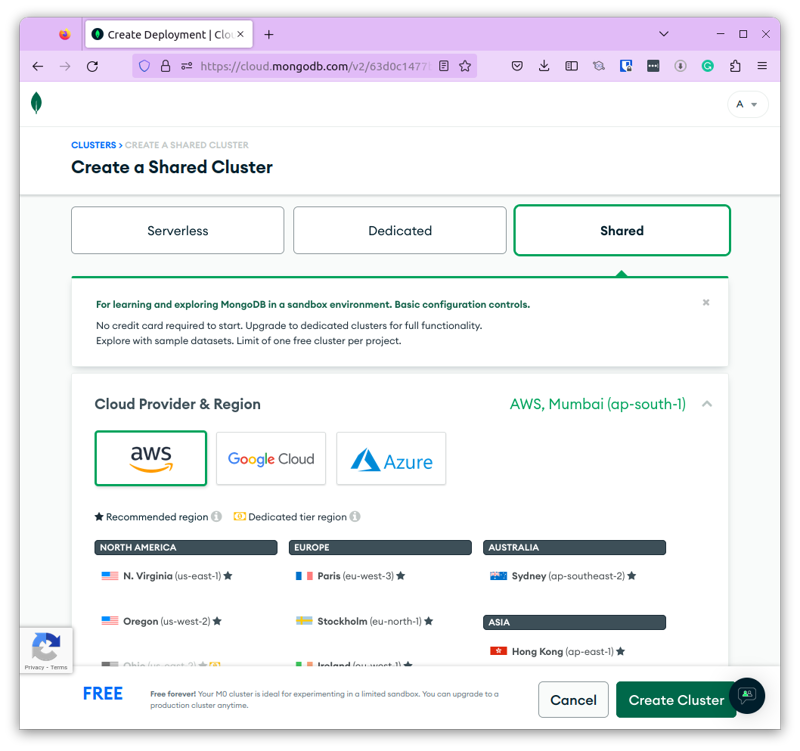
Creating a new shared MongoDB Atlas cluster
Follow the below steps to configure your cluster:
- Provide a cluster name and create a new database.
- It will also ask you to create a user in the process that will be used to access the database.
- The new database is created with a collection and you’ll be able to browse to it once the database is created.
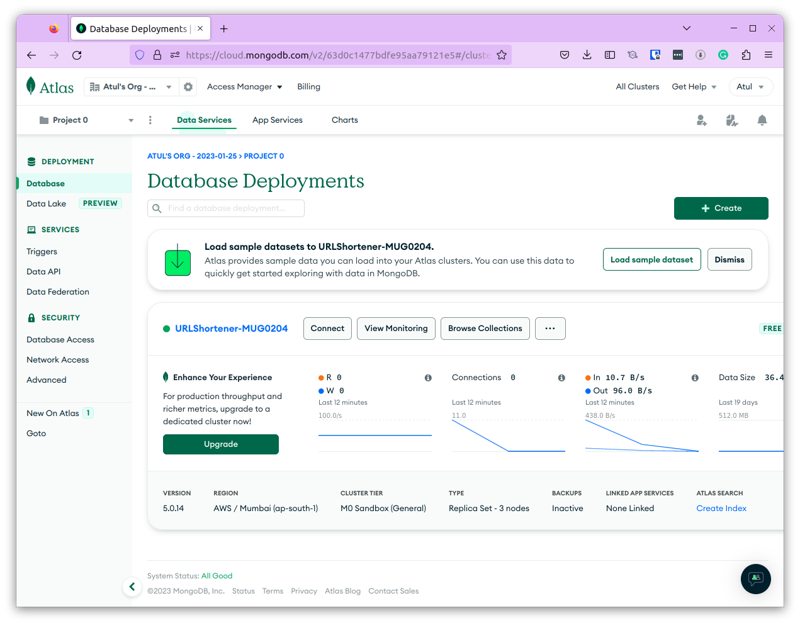
MongoDB Cluster
- Now that we have the database and collection in place, we need to get the
connection stringthat will be required by our application to connect and communicate with MongoDB Atlas.
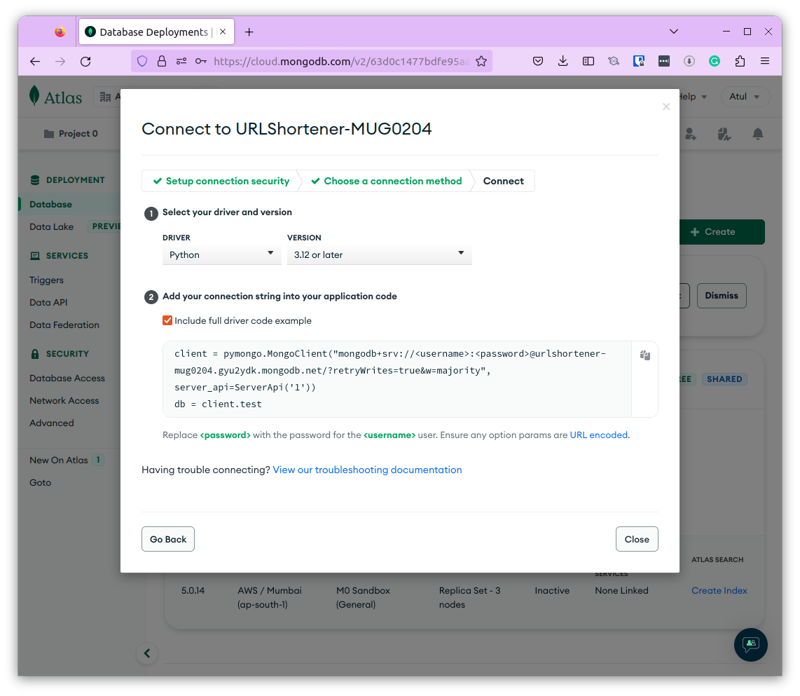
Configuring the connection string
- Click on Connect and choose Connect Your Application.
- Choose a Driver (in this case it’s Python) and a Version.
- It will generate a connection string for you.
- You need to replace the username and password with the actuals that you provided while creating the database. Copy and keep this connection string handy, we’ll need this later while writing the code.
Azure Kubernetes Service
We are also using Azure Kubernetes Service for this demo. We will install Fission on an AKS cluster. Register for a Free Azure Account if you don’t already have one and create a Kubernetes cluster.
Fission
Before you start working on this demo, you need to ensure that you have Fission installed and running on a Kubernetes cluster. You can refer to our Fission Installation guide for more.
Environment Setup
Source Package Setup
The code used for building a serverless URL shortener with MongoDB Atlas and Fission can be found in this URL Shortener repo).
We have two folders, frontend that will have the frontend related code, and backend that will have backend and database related code.
Below is how the folders will look.
This repo contains the following files and folders:
- Backend: backend code with
shortenurl.py. Also containsbuild.shwhich is required to create a Fission package. - Frontend: frontend code with
app.py. Also containsbuild.shwhich is required to create a Fission package. - Package.sh: bash script to create zip files required for creating Fission package.
Steps to use Fission functions with MongoDB Atlas
Clone the URL Shortener repo and perform the following steps.
Note: Make sure to update the MongoDB connection string in
shortenurl.pywith your MongoDB credentials.
For this voting app, we will create python environment, packages, fission functions and routes.
Create a Python environment
fission environment create --name python --image ghcr.io/fission/python-env --builder ghcr.io/fission/python-builder
Once the environment is ready, we create two Fission packages for backend and frontend
Create zip archives for backend and frontend by executing package.sh script
./package.sh
Note: Make sure that the build.sh file is executable. You can do so by running
chmod +x build.sh
Create Fission Packages
fission package create --name frontend-pkg --sourcearchive frontend.zip --env python --buildcmd "./build.sh"
fission package create --name backend-pkg --sourcearchive backend.zip --env python --buildcmd "./build.sh"
You can verify the creation of these packages and status by running fission pkg list command.
NAME                BUILD_STATUS ENV           LASTUPDATEDAT
frontend-pkg        succeeded    python     04 Feb 23 12:09 IST
backend-pkg         succeeded    python     04 Feb 23 12:10 IST
Create Fission Functions for backend and frontend
fission fn create --name frontend --pkg frontend-pkg --entrypoint "app.main"
fission fn create --name backend --pkg backend-pkg --entrypoint "shortenurl.main"
You can verify the creation of these functions by running fission fn list
NAME      ENV       EXECUTORTYPE MINSCALE MAXSCALE MINCPU MAXCPU MINMEMORY MAXMEMORY TARGETCPU SECRETS CONFIGMAPS
backend   python    poolmgr      0        0        0      0      0         0         0
frontend  python    poolmgr      0        0        0      0      0         0         0
Now that our functions are deployed, we need a route to connect to it from our localhost.
We will set up two HTTP routes, one each for frontend and backend by using the following commands:
fission route create --name frontend --method POST --method GET --url /main --function frontend
fission route create --name backend --method POST --url /shorturl --function backend
Note that
frontendwill need bothGET&POSTrequests.
You can verify the creation and status of these routes by running fission route list
NAME     METHOD     URL       FUNCTION(s) INGRESS HOST PATH      TLS ANNOTATIONS
backend  [POST]     /shorturl   backend     false   *    /shorturl
frontend [POST GET] /main       frontend    false   *    /main
We have now successfully created Python environment, Fission packages, Fission functions and routes.
It’s time to run our URL shortener application now.
Testing & Running the URL Shortener App
Since we already have routes created to access our application, we need to get the IP address of the Fission router service. In order to do that, navigate to Services and Ingresses under your Azure Kubernetes cluster. Find the IP address of router and open that in a new window.
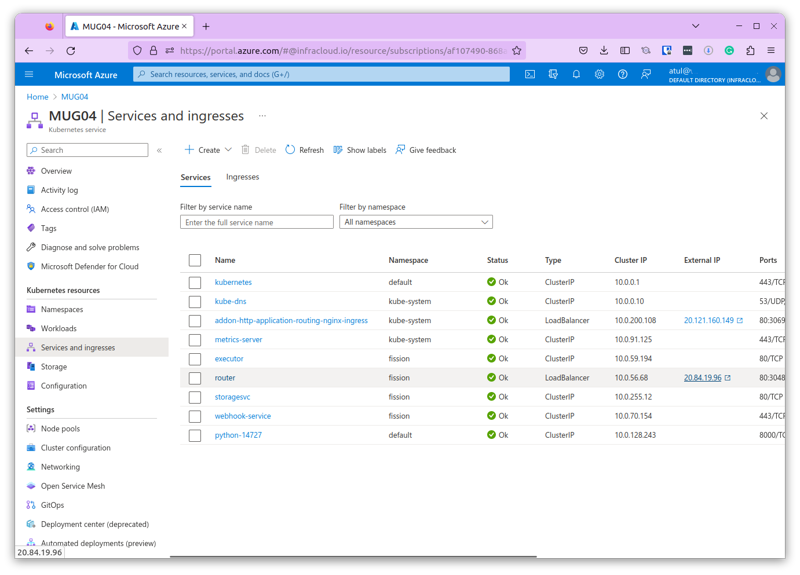
Services and Ingresses page
You’ll see a blank window at first, this is because we have configured our frontend to respond to requests at /main, hence add this to the IP address, and you should see the location.
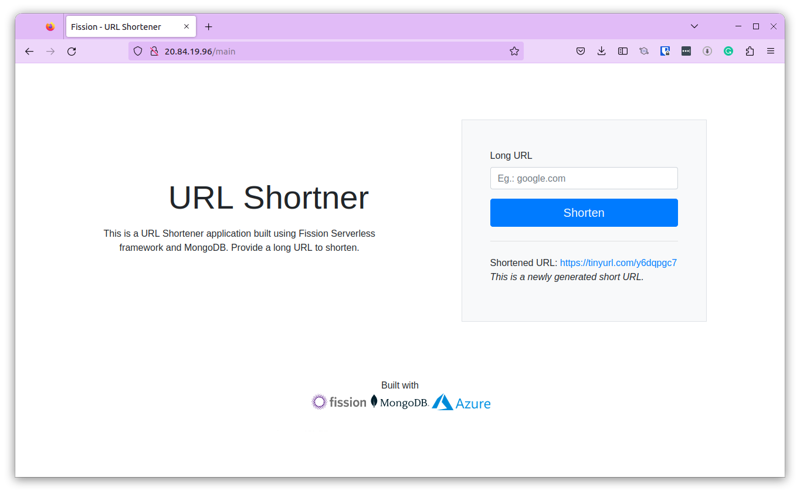
Running the URL shortener app
Provide a regular URL in the text box, and hit Shorten.
It will create a new shortened URL, store it in MongoDB & show the status message This is a newly generated short URL.
Verify the shortened URL in the MogoDB collection.
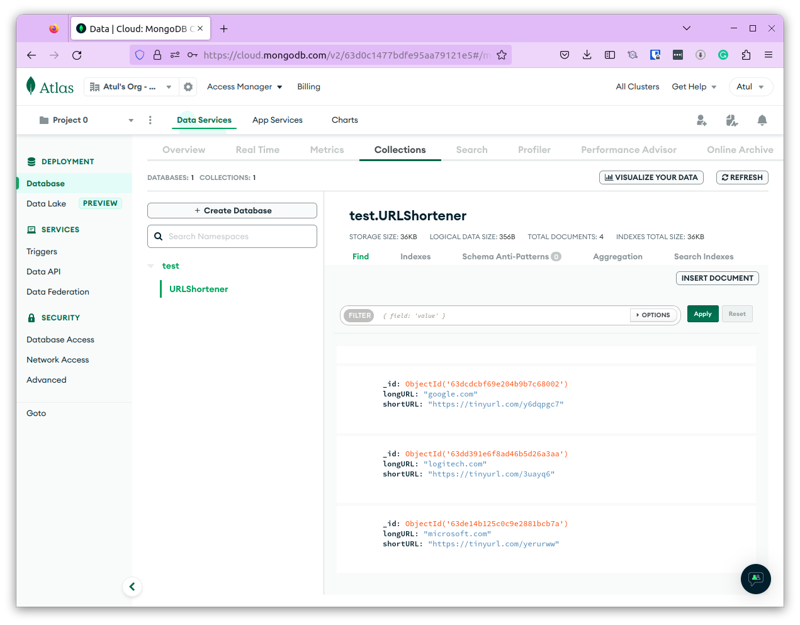
Verify addition of URL to MongoDB Atlas
Come back to the application and provide the same long url and hit the shorten button.
This time the shortened URL will be returned from the MongoDB collection since it already exists.
Status message this time will be This short URL has been retrieved from the database.
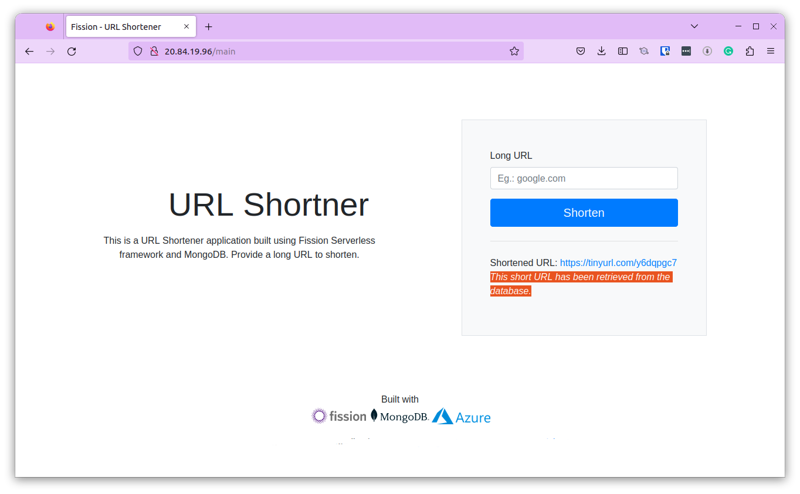
Returning the shortened URL from MongoDB Atlas
In this way, you can use Fission functions to interact with your MongoDB Atlas instance and work with data. For advanced use cases, you can also create Triggers on MongoDB Atlas that allow you to execute a function whenever any new data is inserted, deleted or updated.
Using Fission Spec for faster deployment
Instead of invoking Fission CLI commands over and over, you can specify all the Fission commands used above in a YAML file. Read more about Fission Spec to know more.
Generating Fission Spec
You can open a terminal and key in the all the following commands at once.
fission spec init
fission environment create --name python --image ghcr.io/fission/python-env --builder ghcr.io/fission/python-builder --spec
fission package create --name frontend-pkg --sourcearchive frontend.zip --env python --buildcmd "./build.sh" --spec
fission package create --name backend-pkg --sourcearchive backend.zip --env python --buildcmd "./build.sh" --spec
fission fn create --name frontend --pkg frontend-pkg --entrypoint "app.main" --spec
fission fn create --name backend --pkg backend-pkg --entrypoint "shortenurl.main" --spec
fission route create --name frontend --method POST --method GET --url /main --function frontend --spec
fission route create --name backend --method POST --url /shorturl --function backend --spec
This will create a specs folder with specs for each resource that is required to run this example of using Fission functions with PostgreSQL.
fission spec init
fission environment create --name python --image ghcr.io/fission/python-env --builder ghcr.io/fission/python-builder --spec
fission package create --name frontend-pkg --sourcearchive frontend.zip --env python --buildcmd "./build.sh" --spec
fission package create --name backend-pkg --sourcearchive backend.zip --env python --buildcmd "./build.sh" --spec
fission fn create --name frontend --pkg frontend-pkg --entrypoint "app.main" --spec
fission fn create --name backend --pkg backend-pkg --entrypoint "shortenurl.main" --spec
fission route create --name frontend --method POST --method GET --url /main --function frontend --spec
fission route create --name backend --method POST --url /shorturl --function backend --spec
Creating fission spec directory 'specs'
poolsize setting default to 3
Saving Environment 'default/python' to 'specs/env-python.yaml'
Saving ArchiveUploadSpec '/backend-zip-TRdc' to 'specs/package-backend-pkg.yaml'
Saving Package 'default/backend-pkg' to 'specs/package-backend-pkg.yaml'
Warning: Function's environment is different than package's environment, package's environment will be used for creating function
Saving Function 'default/backend' to 'specs/function-backend.yaml'
Saving HTTPTrigger 'default/backend' to 'specs/route-backend.yaml'
Saving ArchiveUploadSpec '/frontend-zip-PDPu' to 'specs/package-frontend-pkg.yaml'
Saving Package 'default/frontend-pkg' to 'specs/package-frontend-pkg.yaml'
Warning: Function's environment is different than package's environment, package's environment will be used for creating function
Saving Function 'default/frontend' to 'specs/function-frontend.yaml'
Saving HTTPTrigger 'default/frontend' to 'specs/route-frontend.yaml'
You can then run fission spec apply command to have all the resources created at once.
Make sure you run
./package.shbefore applying the spec as the .zip files are required to create the resources.
fission spec apply
DeployUID: a1a8cb83-4867-479c-9faa-f3356279633e
Resources:
* 2 Functions
* 1 Environments
* 2 Packages
* 2 Http Triggers
* 0 MessageQueue Triggers
* 0 Time Triggers
* 0 Kube Watchers
* 2 ArchiveUploadSpec
Validation Successful
Spec doesn't belong to Git Tree.
1 environment created: python
2 packages created: backend-pkg, frontend-pkg
2 functions created: backend, frontend
2 HTTPTriggers created: backend, frontend
Now everytime you modify a function or a package, you don’t need to run the individual Fission CLI command.
You can simply run fission spec apply and it will automatically detect the changes and modify the resources for you.
Conclusion
Congratulations! You now know how to use Fission functions with MongoDB Atlas. This was a simple tutorial to show you how you can leverage Fission and create real world application using MongoDB Atlas. You are now ready to extend this example for your use case, use Fission functions with another relational database or NoSQL database.
Let us know what you’re building?
You can find the code to this example here. For any issues or clarification, you can reach out to the author.
Want more?
More examples can be found in our examples directory on GitHub. Follow Fission on Twitter for more updates!
Author:
Atulpriya Sharma | Developer Advocate - InfraCloud Technologies