How to use PostgreSQL database with Fission functions
Categories:
How to use PostgreSQL database with Fission functions
In today’s blog post we will see how we can use Fission functions to connect to a PostgreSQL database and perform basic operations on it. By the end of this blog post, you would have learnt how to use PostgreSQL database with Fission functions.
Voting App using Fission functions with PostgreSQL Database
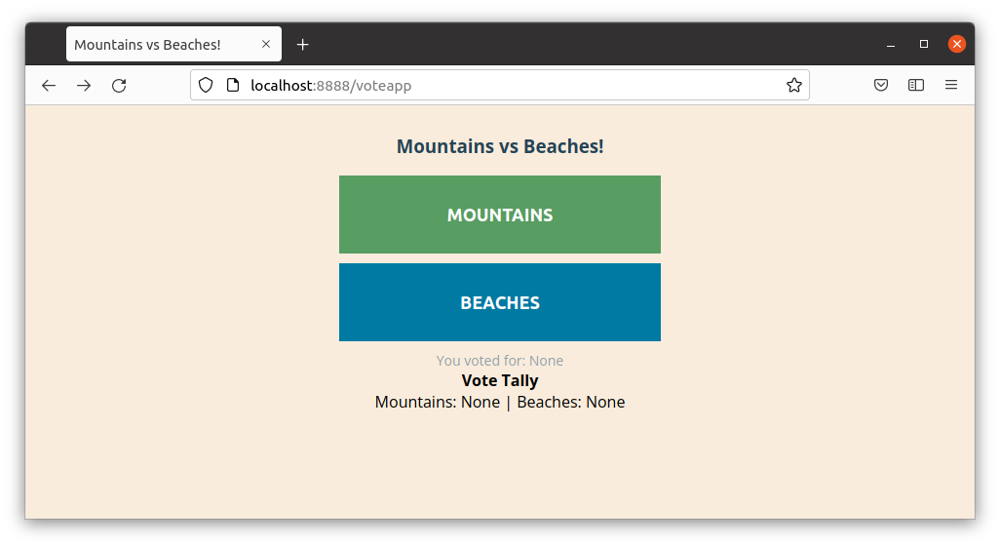
We will create a basic voting application that allows users to vote for an option and view the results. This application is written in Python and uses PostgreSQL database to store the results.
So let’s get started!
Voting App using Fission functions with PostgreSQL Database
Pre Requisites
Fission
Before you start working on this demo, you need to ensure that you have Fission installed and running on your system. You can refer to our Fission Installation guide for more.
PostgreSQL
You must also have a PostgreSQL instance in place. You can either run it on your system locally, in a docker container or in your Kubernetes cluster.
Below are a few guides you can refer to for installing PostgreSQL:
- Installing PostgreSQL on your local system - Postgresql.org
- PostgreSQL Docker container - Docker Hub
- PostgreSQL HELM charts - Bitnami - used in this example
Note: If you have installed it using Helm Charts, please note down the service url and port number. This will be used to connect to the database from the function. You can get it by running
helm status postgresqlin your terminal. You will get the following output.
NAME: postgresql
LAST DEPLOYED: Tue Dec 21 16:50:16 2021
NAMESPACE: default
STATUS: deployed
REVISION: 1
TEST SUITE: None
NOTES:
CHART NAME: postgresql
CHART VERSION: 10.13.14
APP VERSION: 11.14.0

** Please be patient while the chart is being deployed **

PostgreSQL can be accessed via port 5432 on the following DNS names from within your cluster:

postgresql.default.svc.cluster.local - Read/Write connection

To get the password for "postgres" run:

export POSTGRES_PASSWORD=$(kubectl get secret --namespace default postgresql -o jsonpath="{.data.postgresql-password}" | base64 --decode)

To connect to your database run the following command:

kubectl run postgresql-client --rm --tty -i --restart='Never' --namespace default --image docker.io/bitnami/postgresql:11.14.0-debian-10-r17 --env="PGPASSWORD=$POSTGRES_PASSWORD" --command -- psql --host postgresql -U postgres -d postgres -p 5432

To connect to your database from outside the cluster execute the following commands:

kubectl port-forward --namespace default svc/postgresql 5432:5432 &
PGPASSWORD="$POSTGRES_PASSWORD" psql --host 127.0.0.1 -U postgres -d postgres -p 5432
Database and Table Setup
For this application, we have created a database named votedb and a table named votebank. You can use the following sql query to create the table:
CREATE TABLE votebank (
id serial PRIMARY KEY,
voter_id VARCHAR ( 50 )  NOT NULL,
vote VARCHAR ( 50 ) NOT NULL
);
                                  Table "public.votebank"
Column  |         Type          | Collation | Nullable |               Default
----------+-----------------------+-----------+----------+--------------------------------------
id       | integer               |           | not null | nextval('votebank_id_seq'::regclass)
voter_id | character varying(50) |           | not null |
vote     | character varying(50) |           | not null |
Indexes:
  "votebank_pkey" PRIMARY KEY, btree (id)
Environment Setup
Python Environment setup
Using PostgreSQL database with Fission functions require certain non-standard libraries and Python modules. Some of these require C extension to be present in the Python environment. Please refer to our Fisson Python Environment guide and follow the steps to create a custom image.
In this case we need extra libraries like postgresql-dev and libpq.
For this you need to update the Dockerfile and append these two libraries in the RUN command.
It should look like this: RUN apk add --update --no-cache gcc python3-dev build-base libev-dev libffi-dev bash musl-dev postgresql-dev libpq.
After this create a docker image and push it to your Docker hub repository.
Building the docker image for our custom Python environment. (Replace the username with your actual username on Docker Hub.)
docker build -t username/python-postgres --build-arg PY_BASE_IMG=3.7-alpine -f Dockerfile .
Pushing the docker image to Docker Hub registry:
docker push username/python-postgres
Source Package Setup
We will create two folders, frontend that will have the frontend related code, and backend that will have backend and database related code.
Below is how the folders will look.
frontend:frontend.py- code to get and display votes.requirements.txt- Python module dependencies.templatesindex.html- base template for the index page.
___init__.py- standard Python init file.
backend:backend.py- code to connect to DB, update & fetch votes.requirements.txt- Python module dependencies required by backend.py.build.sh- bash script to process the requirements.txt.___init__.py- standard Python init file.
You can view the complete source code here.
Make sure that build.sh file is executable. Update the permissions using
chmod +x build.sh
Before we use our Fission functions with PostgreSQL database, we need to create source packages.
We will create a zip file of both, frontend and backed folders.
You can either zip them manually or create a bash script like the one below to do it for you.
pushd backend
zip -r ../backend.zip *
popd

pushd frontend
zip -r ../frontend.zip *
popd
Steps to use Fission functions with PostgreSQL database
For this voting app, we will create python environment, packages, fission functions and routes.
Creating the Python environment:
fission env create --name pythonsrc --image username/python-postgres --builder ghcr.io/fission/python-builder
Once the environment is ready, we create two Fission packages for backend and frontend
fission package create --name backend-pkg --sourcearchive backend.zip --env pythonsrc --buildcmd "./build.sh"
fission package create --name frontend-pkg --sourcearchive frontend.zip --env pythonsrc
You can verify the creation of these packages and status by running fission pkg list command.
NAME                BUILD_STATUS ENV           LASTUPDATEDAT
frontend-pkg        succeeded    pythonsrc     30 Dec 21 13:09 IST
backend-pkg         succeeded    pythonsrc     30 Dec 21 12:44 IST
Next we will create the Fission functions for backend and frontend
fission fn create --name backend --pkg backend-pkg --entrypoint "backend.main"
fission fn create --name frontend --pkg frontend-pkg --entrypoint "frontend.main"
You can verify the creation of these functions by running fission fn list
NAME      ENV       EXECUTORTYPE MINSCALE MAXSCALE MINCPU MAXCPU MINMEMORY MAXMEMORY TARGETCPU SECRETS CONFIGMAPS
backend   pythonsrc poolmgr      0        0        0      0      0         0         0
frontend  pythonsrc poolmgr      0        0        0      0      0         0         0
Now that our functions are deployed, we need a route to connect to it from our localhost.
We will setup two HTTP routes, one each for frontend and backend by using the following commands:
fission route create --name backend --method POST --url /castvote --function backend
fission route create --name frontend --method POST --method GET --url /voteapp --function frontend
Note that the
frontendwill need bothGET&POSTrequests.
You can verify the creation and status of these routes by running fission route list
NAME     METHOD     URL       FUNCTION(s) INGRESS HOST PATH      TLS ANNOTATIONS
backend  [POST]     /castvote backend     false   *    /castvote
frontend [POST GET] /voteapp  frontend    false   *    /voteapp
We have now successfully created Python environment, Fission packages, Fission functions and routes.
It’s time to run our application now.
Testing & Running the Voting App
Since we already have routes created to access our application, we only need to forward the port to our local host so that we can access the app from our browser.
In order to do that, you need to run kubectl port-forward svc/router 8888:80 -nfission.
Once you’ve executed this, visit http://localhost:8888/voteapp to see the voting app in action.
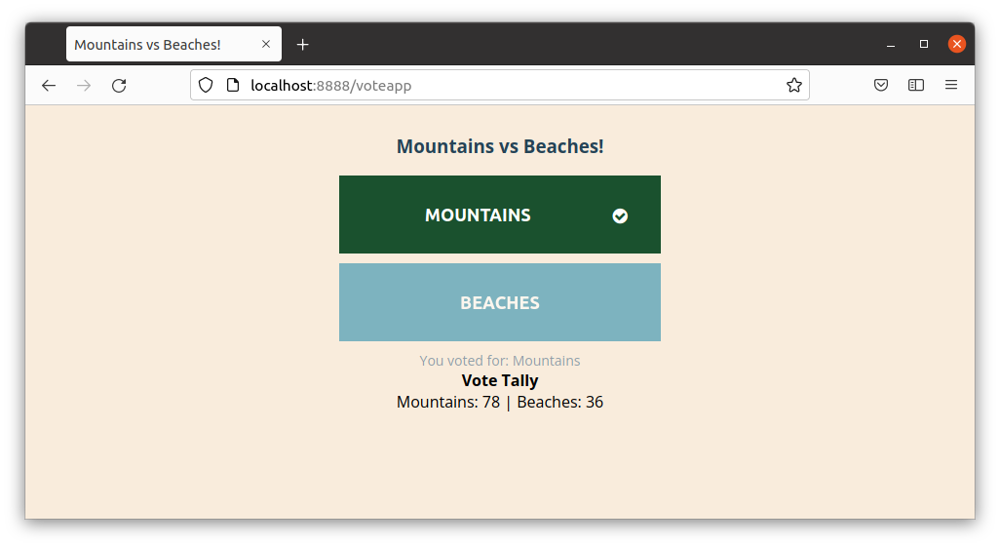
Results from our Voting app
You can also use CURL to test the backend function.
Send the following CURL request to check whether the function is working as expected or not:
curl -XPOST "localhost:8888/castvote" -H 'Content-Type: application/json' -d '{"vote":"Mountains";"voter_id":"asdfg3234"}'
You can also use Postman to test the backend function by sending a POST request.
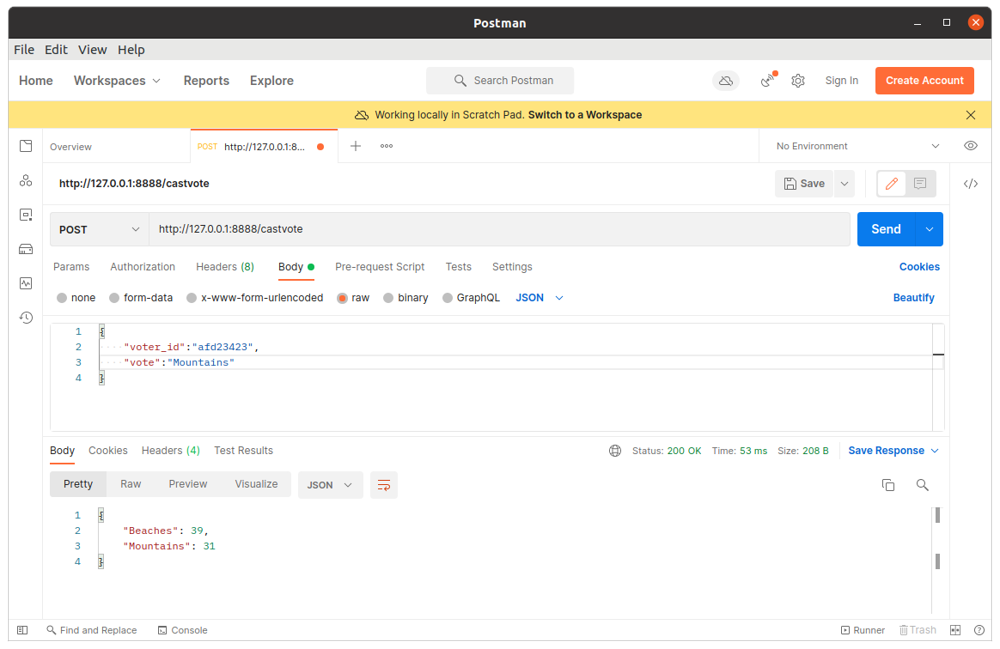
Results from our Voting app
Using Fission Spec for faster deployment
One of the best things about Fission function is YAML Spec. Instead of invoking Fission CLI commands over and over, you can specify all the Fission commands used above in a YAML file. Read more about Fission Spec to know more.
Generating Fission Spec
You can open a terminal and key in the all the following commands at once.
fission spec init
fission env create --name pythonsrc --image python-postgres --builder ghcr.io/fission/python-builder --spec
fission package create --name backend-pkg --sourcearchive backend.zip --env pythonsrc --buildcmd "./build.sh" --spec
fission fn create --name backend --pkg backend-pkg --entrypoint "backend.main" --spec
fission route create --name backend --method POST --url /castvote --function backend --spec
fission package create --name frontend-pkg --sourcearchive frontend.zip --env pythonsrc --spec
fission fn create --name frontend --pkg frontend-pkg --entrypoint "frontend.main" --spec
fission route create --name frontend --method POST --method GET --url /voteapp --function frontend --spec
This will create a specs folder with specs for each resource that is required to run this example of using Fission functions with PostgreSQL.
fission spec init
fission env create --name pythonsrc --image atulinfracloud/python-postgres --builder ghcr.io/fission/python-builder --spec
fission package create --name backend-pkg --sourcearchive backend.zip --env pythonsrc --buildcmd "./build.sh" --spec
fission fn create --name backend --pkg backend-pkg --entrypoint "backend.main" --spec
fission route create --name backend --method POST --url /castvote --function backend --spec
fission package create --name frontend-pkg --sourcearchive frontend.zip --env pythonsrc --spec
fission fn create --name frontend --pkg frontend-pkg --entrypoint "frontend.main" --spec
fission route create --name frontend --method POST --method GET --url /voteapp --function frontend --spec
Creating fission spec directory 'specs'
poolsize setting default to 3
Saving Environment 'default/pythonsrc' to 'specs/env-pythonsrc.yaml'
Saving ArchiveUploadSpec '/backend-zip-TRdc' to 'specs/package-backend-pkg.yaml'
Saving Package 'default/backend-pkg' to 'specs/package-backend-pkg.yaml'
Warning: Function's environment is different than package's environment, package's environment will be used for creating function
Saving Function 'default/backend' to 'specs/function-backend.yaml'
Saving HTTPTrigger 'default/backend' to 'specs/route-backend.yaml'
Saving ArchiveUploadSpec '/frontend-zip-PDPu' to 'specs/package-frontend-pkg.yaml'
Saving Package 'default/frontend-pkg' to 'specs/package-frontend-pkg.yaml'
Warning: Function's environment is different than package's environment, package's environment will be used for creating function
Saving Function 'default/frontend' to 'specs/function-frontend.yaml'
Saving HTTPTrigger 'default/frontend' to 'specs/route-frontend.yaml'
You can then run fission spec apply command to have all the resources created at once.
Make sure you run
.\package.shbefore applying the spec as the .zip files are required to create the resources.
fission spec apply
DeployUID: a1a8cb83-4867-479c-9faa-f3356279633e
Resources:
* 2 Functions
* 1 Environments
* 2 Packages
* 2 Http Triggers
* 0 MessageQueue Triggers
* 0 Time Triggers
* 0 Kube Watchers
* 2 ArchiveUploadSpec
Validation Successful
Spec doesn't belong to Git Tree.
1 environment created: pythonsrc
2 packages created: backend-pkg, frontend-pkg
2 functions created: backend, frontend
2 HTTPTriggers created: backend, frontend
Now everytime you modify a function or a package, you don’t need to run the individual Fission CLI command.
You can simply run fission spec apply and it will automatically detect the changes and modify the resources for you.
Conclusion
Congratulations! You now know how to use Fission functions with PostgreSQL database. This was a simple tutorial to show you how you can leverage Fission and create real world application using databases. You are now ready to extend this example for your use case, use Fission functions with another relational database like MySQL or a NoSQL database like MongoDB.
So what side are you on, Mountains or Beaches? ;)
You can find the code to this example here. For any issues or clarification, you can reach out to the author.
Want more?
More examples can be found in our examples directory on GitHub. Follow Fission on Twitter for more updates!
Author:
Atulpriya Sharma | Developer Advocate - InfraCloud Technologies