Hello World in Go for Kubernetes Newbies
Categories:
Over the past 3 or so years, it seems the term “containerization” and the name “Kubernetes” have been amplified throughout the tech community non-stop. Even with that being so, as a developer, it can be easy to shy away from Kubernetes as its learning curve is notorious for being a steep one. But everyone’s gotta start somewhere, right? This tutorial will give you a basic overview of some of main features of Kubernetes, while walking you through the process of running a simple HelloWorld Golang application locally on your machine to running it on Kubernetes.
Prep & Installations:
- Be sure Golang is installed and Go tools are set up to run our application.
- You’ll need to download Homebrew to download your driver. In this tutorial we’ll be using xhyve.
- Install Docker (We’ll be using Docker for Mac for this tutorial)
Now let’s get into it!
Create a Minikube Cluster:
In this tutorial, we’ll be using Minikube to create a cluster locally. If you are not using a Mac, see the Minikube installation guide as the instructions might be different.
Use curl to download the latest release of Minikube:
curl -Lo minikube https://storage.googleapis.com/minikube/releases/latest/minikube-darwin-amd64 && \
chmod +x minikube && \
sudo mv minikube /usr/local/bin/
Now we’re gonna use Homebrew to install the driver:
brew install docker-machine-driver-xhyve
sudo chown root:wheel $(brew --prefix)/opt/docker-machine-driver-xhyve/bin/docker-machine-driver-xhyve
sudo chmod u+s $(brew --prefix)/opt/docker-machine-driver-xhyve/bin/docker-machine-driver-xhyve
We need to install Kubernetes’ kubectl command-line tool, which will be our right hand for interacting with our cluster:
brew install kubectl
Now let’s go ahead and start the Minikube cluster:
minikube start --vm-driver=xhyve
(Note: the –vm-driver=xhyve flag specifies that you are using Docker for Mac.)
Next, you’ll need to configure kubectl to communicate specifically to the minikube cluster. In order to do that, we have to set the Minikube context, as such:
kubectl config use-context minikube
Now let’s check to see if kubectl is all configured to interact with our cluster:
kubectl cluster-info
What just happened?
So the first thing we did was create a Kubernetes cluster via a VM called Minikube. MiniKube is a popular tool used to run Kubernetes locally. Then we installed a hypervisor (xhyve) for Docker to run on Minikube.
After that, we configured Kubernetes’ command line-tool, kubectl, to communicate specifically with our minikube cluster.
Now Let’s Create our Golang application!
Go and download the HelloWorld source code by running the commands below:
git clone https://github.com/timirahj/kubernetes_examples
cd kubernetes_examples/helloworld
Our app is a simple http web server that prints a “Hello World” message. You can give it a test run using go run helloworld.go and then opening http://localhost:8080 in your browser.
NOTE: If you take a look inside the repo, a Dockerfile has already been created. A Dockerfile typically contains all the instructions on how the image is built. However, if you open our Dockerfile, you will notice that it looks a little vague with only two simple commands. Is this Dockerfile complete? Actually, yes! Golang has a variant called “onbuild” which simplifies the build process for our Docker image. When we use the onbuild variant, we’re implying that our image application should be built with generalized instructions as any generic Go application, and the image automatically copies the package source then builds the program and configures it to run upon startup.
In the next step, we’ll be packaging our application in a Docker container.
Create our Docker Image
Now let’s build our container image and tag it:
docker build -t helloworld:v1 .
Let’s double check to see if our build succeeded. If it was, we’ll see our image listed by running this command:
docker images
Push your Docker Image to the Cloud
Now we need to push our container to a registry. A container registry is library is a library of docker images. Docker hosts a free registry called DockerHub, that’s the one we’ll be pushing our container to.
If you’re running Docker for Mac, make sure you’re logged into your Docker account and that Docker is running on your machine. You can do that by clicking the Docker icon at the top of your screen. You should see a green light to verify that it’s running.
First you’ll need to sign up to create an account on DockerHub.
(Click here for these instructions using other operating systems.)
Go to https://hub.docker.com, log in, then create a repository called hello-world (ex. timirahj/hello-world).
Now let’s log into the Docker Hub from the command line:
docker login
Go ahead and enter your credentials when prompted.
If you’ve installed Docker for Mac, you can log into your Docker account by clicking the Docker whale icon at the top of your screen as shown below.
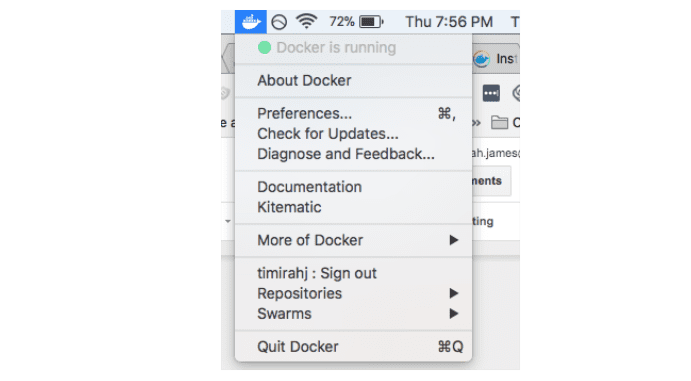
The green light indicates that Docker is currently running. (Click here for these instructions using other operating systems.)
Now we’ll need to check the image ID:
docker images
Your output should look something like this:
REPOSITORY              TAG       IMAGE ID         CREATED           SIZE
helloworld              v1       056yb71fy406      5 minutes ago    1.076 GB
monty_grapher          latest    pp58734h67dd     12 minutes ago    1.658 GB
steph/train            latest    9857j776f554      8 days ago       1.443 GB
Update your image’s tag and the name of your Docker Hub repo:
docker tag helloworld:v1 yourhubusername/hello-world:v1
Finally, push the image to your Docker Hub repo:
docker push yourhubusername/hello-world
Run the Container
We can test out our container image locally first by running this command (be sure to replace ‘yourusername’ with your actual DockerHub username):
docker run -p 8080:8080 yourusername/hello-world:v1
Then open a new tab in your terminal and enter:
curl http://localhost:8080
Lo and behold, there’s our ‘Hello World’ message.
What just happened?
So after we downloaded the application, we then created a container image for our application to and its dependencies to live in. We then pushed that image to Docker Hub, Docker’s official container registry. Pushing our container to the cloud gives us the ability to access that container any given time, even if we tear down our local cluster, or if we want to pull that container to live in separate cluster. After that, we ran the container, binding our local port to the port of the container (8080:8080).
Deploy
In Kubernetes, containers are interpreted as objects called Pods (one or more containers in a group). The Pod in our cluster only has one container, the one we just created.
Now how do we manage this Pod? Kubernetes provides a special supervisor for Pods called Deployments. Deployments are responsible for monitoring and managing everything from scaling, to version upgrades, to overall health of Pods.
To create a deployment, we’ll have to use Kubernetes’ kubectl for the following command:
kubectl run helloworld --image=yourusername/hello-world:v1 --port=8080
Once the Terminal confirms that your deployment has been created, we can view it by running
kubectl get deployments
Your output should look something like this:
NAME         DESIRED   CURRENT   UP-TO-DATE   AVAILABLE   AGE
helloworld    1         1         1            1           3m
Now let’s take a look at our Pod:
kubectl get pods

NAME                                         READY     STATUS    RESTARTS   AGE
helloworld-7447bd7d5d-lwnxh                   1/1      Running      0        1m
What just happened?
Woah! So now our container lives inside a Pod, and Kubernetes has given us a manager, a Deployment, to keep tabs on our Pods health, scaling and load-balancing, and versioning.
Now let’s take a look at this via the Kubernetes dashboard. Open the dashboard in your browser with this command:
minikube dashboard
You should see something similar to this…
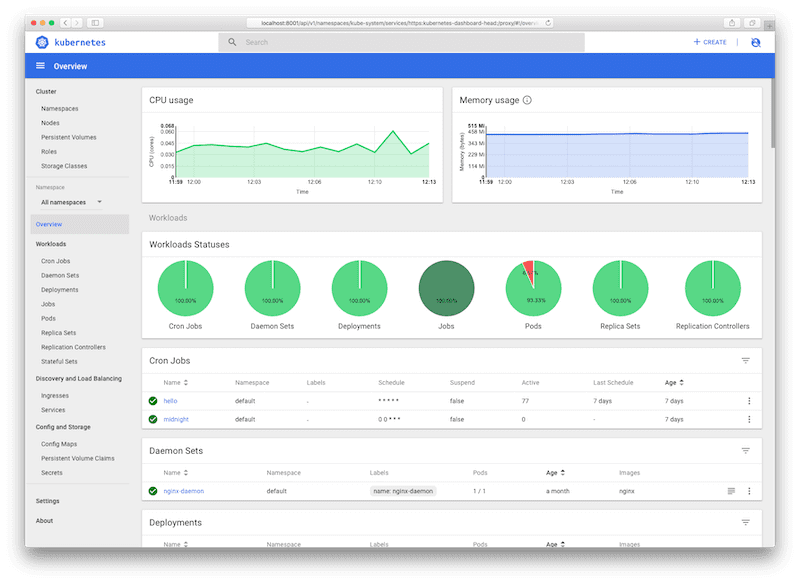
It’s your cluster in the flesh! The top centered section displays the statuses of your workloads within the cluster. Workloads are objects used to manage and run your containers in your cluster – so for example, you should see circles that represent your Pods, Deployments, and Replica Sets. Each of those objects fall in the workload category. The circles are pass/fail pie charts, with green indicating the percentage of success and red indicating the percentage of failures. For example, let’s say we have 3 Pods in our cluster, and 1 of our Pods has died for whatever reason. The Pod chart would be shown as mostly green representing 67% and partially red representing 33%.
The Kubernetes dashboard is super handy, giving a clean and straightforward visual representation for all the elements related to our cluster.
Create a Service
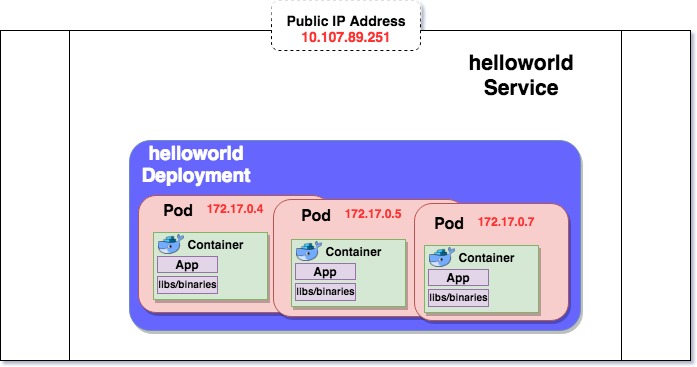
In order to make our Pod accessible outside of the cluster, we have to create what’s called a “Service”. A service provides an IP address that maps to a set of pods with identical labels.
Every Pod is born with its own unique IP address. When a service is created, the IP addresses of Pods become endpoints of the service, and the service load-balances over its endpoints. A service can also exclusively internal to the cluster. The internal/external state of a Service is controlled by setting a Service Type. When set to type LoadBalancer, the service is made public and the IP address is exposed from the cluster and mapped to the endpoints (i.e. the Pods).
Go ahead and create a Service by running the command below:
kubectl expose deployment helloworld --type=LoadBalancer
Here we use the –type=LoadBalancer flag to indicate that we want our Service to be exposed outside of our cluster.
Now let’s test to see if our Service is accessible:
minikube service helloworld
This uses a local IP address that serves our app and opens up a browser displaying our “Hello World” message.

Check out this diagram of our service.
Scaling our App
Our application is available for external use! But what if there’s too much usage? Too many requests, too much traffic? Our Pod is still liable to get overworked and ultimately fail if the traffic becomes too heavy. Deployments solve this issue by creating replica Pods to add the the cluster. You can define how many replicas you need to be running at all times.
We can accomplish this by running the kubectl scale command. Let’s go ahead and use it to create 2 replicas:
kubectl scale deployment hello-world --replicas=3
Note: Since we are creating 2 more replicas, we set the value to 3 because that will be the total number of Pods in the Deployment.
Let’s check to see if the number of replicas have been updated:
kubectl get deployment hello-world

NAME        DESIRED   CURRENT   UP-TO-DATE   AVAILABLE   AGE
hello-world   3         3           3            2        1m


kubectl get pods

NAME                           READY     STATUS     RESTARTS      AGE
hello-world-5dc98cf5d6-7w9vs   1/1       Running       0          23h
hello-world-5dc98cf5d6-p2bxs   1/1       Running       0          16s
hello-world-5dc98cf5d6-scqhq   1/1       Running       0          16s
And now our Service will automatically begin distributing traffic amongst these three Pods.
Updating your Application
Now what if we need go and to make changes to our application? What if we want to change our message from “Hello World!!” to “Finally Completed this Tutorial!!”?
Let’s go into our source code (helloworld.go file) for our application and change it to return our new message.
Change line 16 in helloworld.go to:
fmt.Fprint(rw, "Finally Completed this Tutorial!!")
Now we want to build a new version of our Docker image:
docker build -t yourhubusername/hello-world:v2 .
Go ahead and push the updated image to Docker Hub:
docker push yourhubusername/hello-world
Update the image for the Deployment:
kubectl set image deployment/helloworld helloworld=yourhubusername/hello-world:v2
Now we can check for our updated message:
minikube service helloworld
A Clean Finish
Now after all that hard work… let’s throw it all away!
You can clean out your cluster simply by using:
kubectl delete service helloworld
kubectl delete deployment helloworld
Stop Minikube, then delete it:
minikube stop
minikube delete
Keep Learning!! (Further Reading)
Bonus – also, be sure check out this awesome (and FREE) course on Microservices and Kubernetes by Udacity
Author: Timirah James | Fission Developer Advocate, Platform9 Systems | Tweet the Author